Summary
– Step 1: Make a diagnosis of the plaster wall
– Step 2: Fill large holes
– In case of major cracks in the wall: glass cloth
– If the wall is not flat: smoothing compound
– Step 3: Fill small cracks and holes
– Step 4: Sand the plaster wall
– Step 5: Clean the plaster wall
– Step 6: Apply an adhesion promoter to the plaster wall
– Step 7: Plan the installation and tile the plaster wall
It is possible to tile a plaster wall, provided you prepare it well. The wall must be solid, clean, and smooth so that the tile can be securely attached to the wall.
To tile a plaster wall, test its strength, fill in gaps and cracks, sand, and wash it.
Materials for tiling a plaster wall
Filling plaster
Spatula
Plaster tiles
Sander
Adhesion primer
Roller
Hammer
Triangular scraper
Tarp
Painter’s knife
Trough
Smoothing compound
Grass brush
1. Diagnose the plaster wall
The plaster wall must be solid, smooth, level, and clean to support the weight of the tile. Before tiling a plaster wall, make sure it is strong enough.
What if there is moisture on the plaster wall?
It is not possible to tile a wet wall. Treat the moisture problems on the walls first before tiling.
How can you tell if a plaster wall is damp? First of all, you can see it: the moisture leaves apparent stains. Then, you can feel it with your bare hands: you can smell the humidity. If needed, there are also devices to measure the moisture of the walls.
It is preferable to call on a professional who will determine the cause of the moisture in the walls. He will advise you on the solutions to treat the humidity effectively.
What to do if the plaster wall is crumbly?
If the plaster wall is crumbly, apply a primer for crumbly surfaces. This product can be used on walls with a roller to harden powdery, floury, or crumbly plaster substrates.
To apply the primer fixative:
– Start by airing the room protecting the floor with a plastic sheet or newspapers.
– Pour the primer into a paint tray and dip the paint roller into it.
– Apply the product to the wall with the roller and let it dry for the time indicated on the package.
Wear gloves and goggles when applying the primer.
2. Fill in any large holes
If your wall has a large hole:
– Start by removing the debris and scraping the edges with a triangular scraper to eliminate the crumbly parts. This will ensure a better setting of the plaster or patch.
– Dust the hole with a quack brush.
– Prepare a plaster in a plaster pan or trough according to the manufacturer’s directions.
– Protect the flooring with a tarp or used sheets.
– Wet the inside of the hole with a damp sponge to ensure proper plaster adhesion.
– Scoop a small amount of filler with a painting knife and place it in the hole.
– Press the blade of the knife firmly into the hole.
– Smooth it out with several strokes of the knife and remove any excess filler.
– Let dry before sanding lightly if necessary.
If the wall has many irregularities and large cracks, you must cover it with canvas.
Covering a wall consists in putting a glass cloth. It is a resistant wall covering that consolidates and masks the defects.
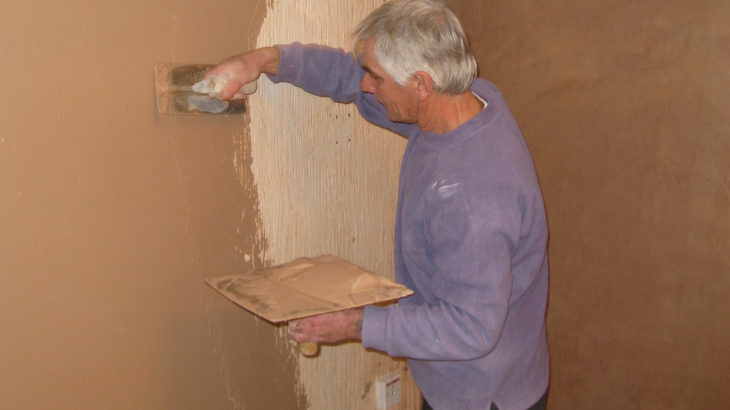
In the event of defects in the flatness of the wall: the smoothing coating
If the wall has many irregularities and is not flat, apply a smoothing compound.
The coating is applied to the entire surface of the wall:
– Apply the plaster starting from the bottom of the wall.
– Work in small square areas of about 50cm on each side.
– Smooth with a coating knife.
– Let dry.
Note: it is perfectly possible to apply a smoothing compound on a glass cloth. If your walls have cracks and unevenness, first lay the glass cloth and apply the smoothing mixture.
3. Fill small cracks and holes
Fill small holes and cracks with filler or ready-mixed mortar.
– Use a spatula to fill in the holes.
– Clean them with a brush to remove dust and small debris.
– Using the spatula, fill the holes with mortar filler.
– Smooth with the spatula, remove the excess plaster.
– Let dry.
– Once the filler is dry, lightly sand with sandpaper to completely smooth the surface.
4. Sand the plaster wall
Tile must be installed on a clean, sound surface and adhere well.
Sand the wall with a sander:
– Start by sanding the wall once with heavy-grit sandpaper.
– Then, use fine-grit paper to smooth out the entire surface.
When sanding a wall, wear a mask and protective eyewear.
5. Clean the plaster wall
Once you have sanded your wall, clean it to remove any dust or grease.
– You can use an alkaline detergent or a special wall washing product: one part usually requires four parts of water.
– Wash the wall: rub it with an abrasive sponge or a brush
– Rinse with clear water.
– Let dry completely.
Important: Before washing the wall, turn off the power supply, remove electrical boxes and outlets, install dominoes and tighten them.
6. Apply an adhesion primer to the plaster wall
Apply a primer to the wall. The primer is like a paint undercoat; it makes it easier for the thin-set mortar to adhere to the wall.
– Spread the primer in vertical strips on the walls with a roller.
– “Cross” the passes to cover the entire wall surface.
– To coat corners and edges, use a brush.
7. Plan the installation and tile the plaster wall
Once the wall is ready, perfectly clean, flat, solid, and dry, plan the installation of the tiles.
Measure the wall, calculate the number of tiles needed to tile it, determine a starting point for the installation and plan the order in which the tiles will be laid. This step is called layout.
Once you have planned the installation, measured and traced, prepare the adhesive mortar, glue the wall and install the tiles.


