A pergola structure decorates and creates a welcoming atmosphere in our garden. In DIY stores we can find pergolas of different sizes and materials that are very easy to assemble. If we do not want to buy it, following a few very simple steps, we can make our own custom pergola. Interested in learning more? You’ve reached the right place as today, that’s exactly what we are going to uncover! Read on.
To build a pergola, we will start by attaching the beam to the wall. Next, we will attach two posts to the ground with brackets that will allow us to adjust the height of the pergola and protect it from moisture. We will continue to join the joists until we finish the whole wooden structure. Finally, we will give a protective base and apply a coat of stain. Below, we will show you in more details, and in step by step how to make a wooden pergola.
Things You Will Need
Tools
- Chainsaw
- keyhole saw
- blade for wood
- Spade bit 26mm
- socket wrench 12mm
- Driver drill
- Widia drill bit 16mm
- Widia drill bit 10 mm
- 5mm wood drill bit
- Extra long drill bit for wood 8mm
- 17mm spanner
- open end wrench 13mm
- silicone applicator gun
- palette
- Roller
- Tray
- sander
- Level
Materials
- Wooden beams 160X120 cm
- Wooden beams 120X80 cm
- Wall beam 140X45 cm
- Adjustable metal bases
- chemical wad
- cells
- Screw bolt 8X180 mm
- Screw bolt 8X220 mm
- Screw bolt 5X100 mm
- Barraqueros 8X40 m
- M8 threaded rod
- M6 threaded rod
- M8 nut
- M6 nut
- Washer for M8
- Washer for M6
How to Build a Wooden Pergola, Step by Step
Step 1
- We start by cutting the two posts. We can order them to measure in our DIY store or cut them ourselves. To do this work, we can use a handsaw or use a chainsaw, which will make it easier. We mark the cutting lines, then we position the tool on the piece of wood. Following the line, we cut.
Step 2
- Next, using a square, we draw two diagonals on one end of the post. At the center point, this will be the place where we will make the housing for the threaded rod of the adjustable support.
Step 3
- Then, using the drill and a drill bit with a diameter larger than the rod, we make the hole. In our case, we used a 26 mm drill bit. Following the same procedure, we make a hole in the other post.
Step 4
- Next, we present the support plate and make some guide holes To do this, we will use a drill bit to drill the wood.
Step 5
- Then, using the drill and a socket wrench, we attach the metal piece with barraqueros screws.
Step 6
- Now we move to the joists. Once cut to size, we will proceed to shape the ends . For this, we will use a template with two drawings. One, to give the corrugation to one of the ends and the other, the angulation needed to be able to attach the pieces to the structure. We put the template on one of the ends of the joists and draw the outline.
Step 7
- Then, using the other drawing of the template, we give the angulation of 15º to the other end of the joists.
Step 8
- Then, using the jigsaw, equipped with an extra long blade for wood, we cut the ends.
Step 9
- We will now create the beam that we will attach to the wall. To do this, we will splice two pieces of wood. Instead of joining them directly, we will cut the ends at an angle to obtain a stronger connection.
Step 10
- Next, using the drill and a wood bit, we will make holes in the pieces so we can attach them to the wall.
Step 11
- Assemble the two pieces with clamps, matching the two angled ends and making pilot holes.
Step 12
- Then, using the same tool and an appropriate tip, attach the two pieces with lag screws.
Step 13
- Then, using the sander, we go over the entire surface of the wood, making it very smooth. We clean the dust produced with a cloth.
Step 14
- We proceed to the assembly of the structure. We present the beam on the wall, at a height of about 2.40 m from the ground. We support the piece and, using the level, we mark the fixing points, very horizontal, on the wall. With the percussion drill and a 10 mm drill bit, we begin to make the holes.
Step 15
- Next, we remove the piece and finish drilling the holes, this time with a 16 mm concrete bit.
Step 16
- We clean well the inside of the holes…
Step 17
- … and as in this case the wall is hollow, we introduce some sieves .
Step 18
- It is the turn of the chemical taco. We put the mixing nozzle on the cartridge, we place the cartridge in the gun and we press until we obtain a homogeneous mixture. Then we insert the nozzle all the way into the holes and fill them.
Step 19
- While the product is still fresh, we insert the threaded rods, turning them slowly to avoid the formation of air bubbles.
Step 20
- We wait for the chemical block to harden and place the beam on the wall, matching the holes with the rods.
Step 21
- Then we secure the piece with washers and nuts, which we tighten with a wrench.
Step 22
- Next, we present the adjustable bases on the floor, well squared and we mark the fixing points on the floor.
Step 23
- Then, with the help of the drill and a 10 mm wide bit, we make the holes. We clean up the dust produced…
Step 24
- … and we apply a chemical block inside the holes.
Step 25
- Before the product is dry, we insert the threaded rods, turning them to avoid the formation of air bubbles.
Step 26
- We install the base and secure it with nuts and washers. Following the same procedure, we attach the other adjustable metal base.
Step 27
- Next, we insert the posts by turning them until we obtain the desired height.
Step 28
- Then, we check its verticality with a spirit level.
Step 29
- The next step will be to present the joist that will go in the front part of the structure, leaving the same margin on both sides. With the level, we check its horizontality.
Step 30
- Now we attach an extra long wood bit to the drill and make the mounting holes.
Step 31
- Then, using the same tool and an appropriate bit, we fasten the piece with lag screws.
Step 32
- We continue to assemble the structure of the pergola. Insert the first crosspiece …
Step 33
- … and attach it to the front beam and to the one we have attached to the wall. To do this, we will use direct insertion screws.
Step 34
- We continue attaching the rest of the joists until the pergola is finished. Remember that it is very important to leave the same space between them when you hold them.
Step 35
- Next, we apply the bottom of the pergola. We can do this work with a spray gun. For this, it is important to protect the rest of the elements that we do not want to paint. We can also do it with a palette knife and a roller.
Step 36
- Once the product has dried, we apply the stain on the entire wooden surface. We let it dry.
Step 37
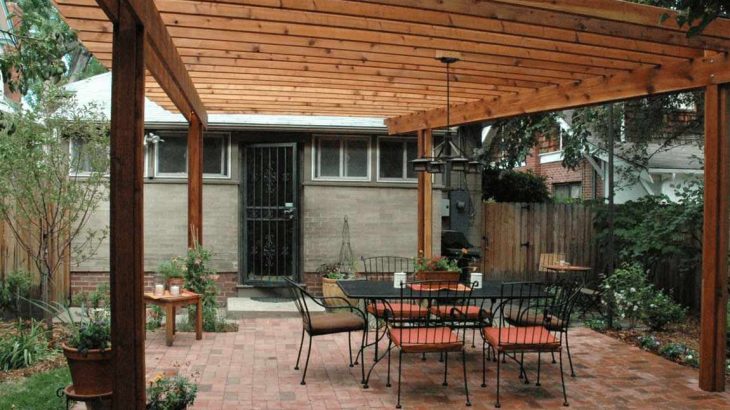
- And here is the result! A decorative structure for a pergola, with which we managed to create a welcoming space, where you can enjoy the outdoors. A quick and easy DIY job for any handyman.
So what are your thoughts on those smple steps? Let us know in the comments below.


One thought on “Your Step by Step Guide to Building Your Pergola”